
How to Fold and Seal Samosas
To fold and seal a samosa, overlap a flexible wrapper into a cone with a closed tip, secure the side seam, and add cooled filling below the opening so bare pastry remains for closure. Apply a thin layer of flour-and-water sealing paste to the final contact edges, fold them into a triangle and press them together; check both seams and all corners for gaps before cooking.
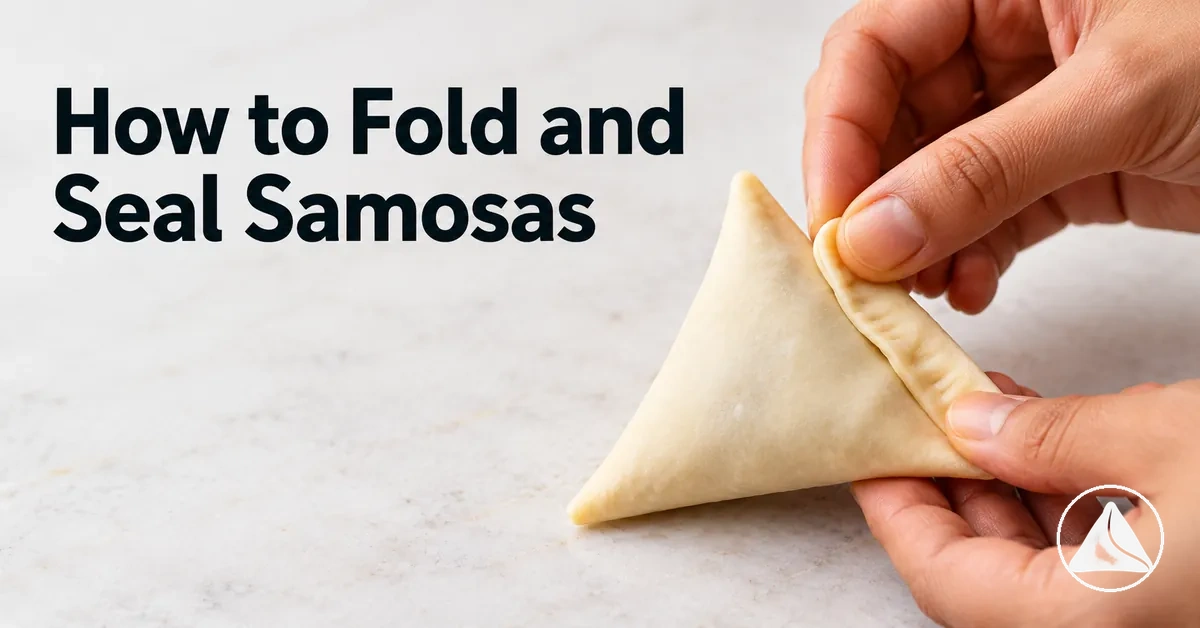
Folding and sealing at a glance
The five-stage samosa fold
Work through these stages in order. Each stage includes an action and an observable check before moving on.
-
Prepare the wrapper
Use intact, flexible pastry, cooled filling and smooth, spreadable sealing paste.
Check: The wrapper bends without cracking and the paste does not drip.
-
Fold and secure the cone
Overlap the wrapper edges, close the pointed tip and secure the side seam.
Check: The tip is closed, the overlap lies flat and the top stays open.
-
Fill without crowding
Add cooled filling gradually, leaving headspace and a clean sealing margin.
Check: The top edges meet without strain or trapped filling.
-
Close the final seam
Apply a thin film of paste to the contact edges; align and press from corner to corner.
Check: The triangular parcel has a flat, continuously joined final seam.
-
Inspect before cooking
Check the cone tip, side overlap, final seam, corners and wrapper surface.
Check: No visible holes, tears, lifted edges or filling in the seam; gently handled edges remain together.
Ready for cooking? A fully closed triangle passes the assembly check. An intact seal helps the parcel hold together but cannot guarantee the result once cooked.
The wrapper’s size and shape determine how its edges overlap, so the first folding movement may differ between semicircular and other wrapper shapes. Keep the overlap wide enough to close the seam but not so wide that it crowds the cavity; place sealing paste only on the surfaces that need to adhere.
Table of Contents
Prepare the Wrapper and Sealing Paste
Before folding a samosa, check that the wrapper is flexible with intact edges, the work surface is clean and dry, and the sealing paste has a smooth, spreadable consistency.
Keep the cooled filling separate until needed.
The preparation image shows these components arranged before folding begins.
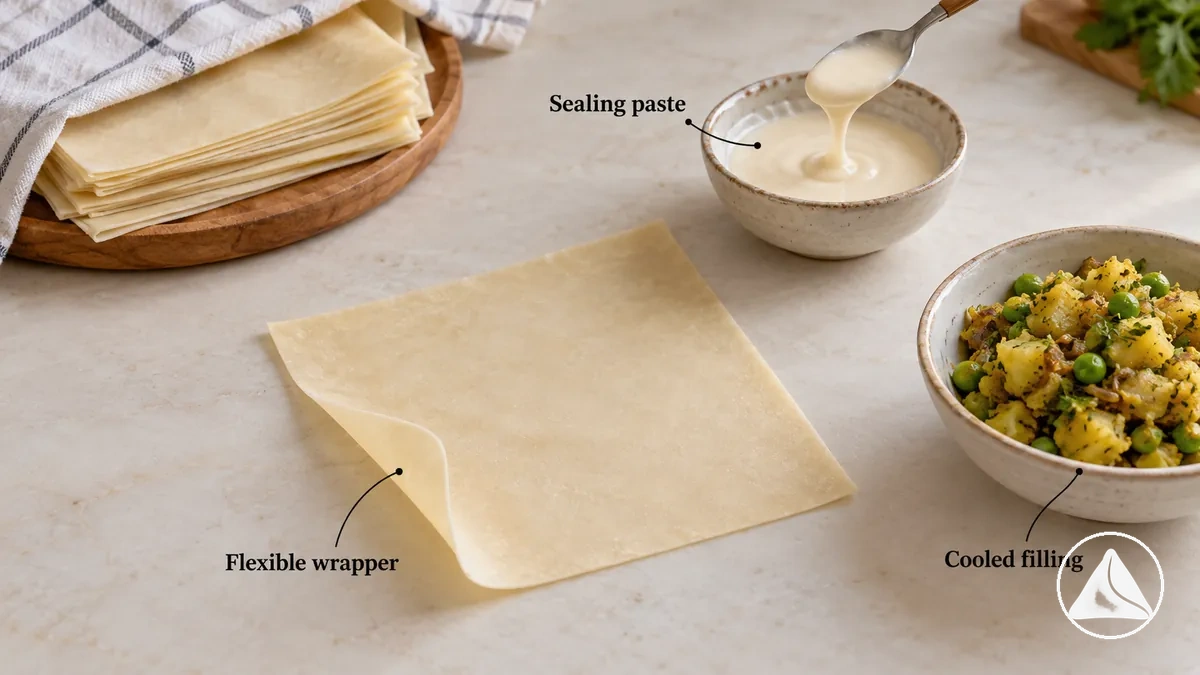
A flexible wrapper bends into folds without splitting, while dry or cracked edges can tear and make continuous seam contact difficult.
Sealing paste should spread in a thin layer where the wrapper edges meet; runny paste can drip away, while thick or lumpy paste can interfere with flat contact.
Thin ready-made pastry may require gentler handling than a thicker dough wrapper, but both need intact edges that can meet cleanly.
Check the following conditions to identify what is ready and what needs correction before folding.
- Wrapper flexibility: Ready when the wrapper bends gently without cracking or tearing. If it splits during handling, set that wrapper aside and use one that bends without cracking.
- Edge condition: Ready when the edges are smooth and intact, allowing overlapping surfaces to meet evenly. Torn, curled, or cracked edges may leave gaps along the seam.
- Work surface: Ready when the surface is clean, dry, and flat, allowing the wrapper to lie evenly during handling. Remove loose filling, flour clumps, or excess moisture that could interfere with folding or sealing.
- Sealing paste consistency: Ready when the paste is smooth, tacky, and spreadable without dripping or forming lumps. Paste that runs or sits in thick clumps needs adjustment before application.
- Protection from drying: Keep unused wrappers covered while working to limit exposure to air, using a cover suited to the pastry type so the surface does not become wet or sticky. If exposed edges become stiff or brittle, they may crack during folding and require correction or replacement.
- Filling readiness: Keep cooled filling separate from the wrapper until the cone is formed. This leaves the wrapper unobstructed during folding and reduces premature moisture contact.
Make a Flour-and-Water Paste for Sealing
Make a flour-and-water sealing paste by mixing flour with water until the paste is smooth, tacky, and thick enough to spread in a thin line without dripping.
Paste that is too runny can flow away from the seam, while paste that is too thick may form lumps that interfere with flat contact between the samosa wrapper edges.
The close-up image shows the cohesive, spreadable consistency needed for sealing.
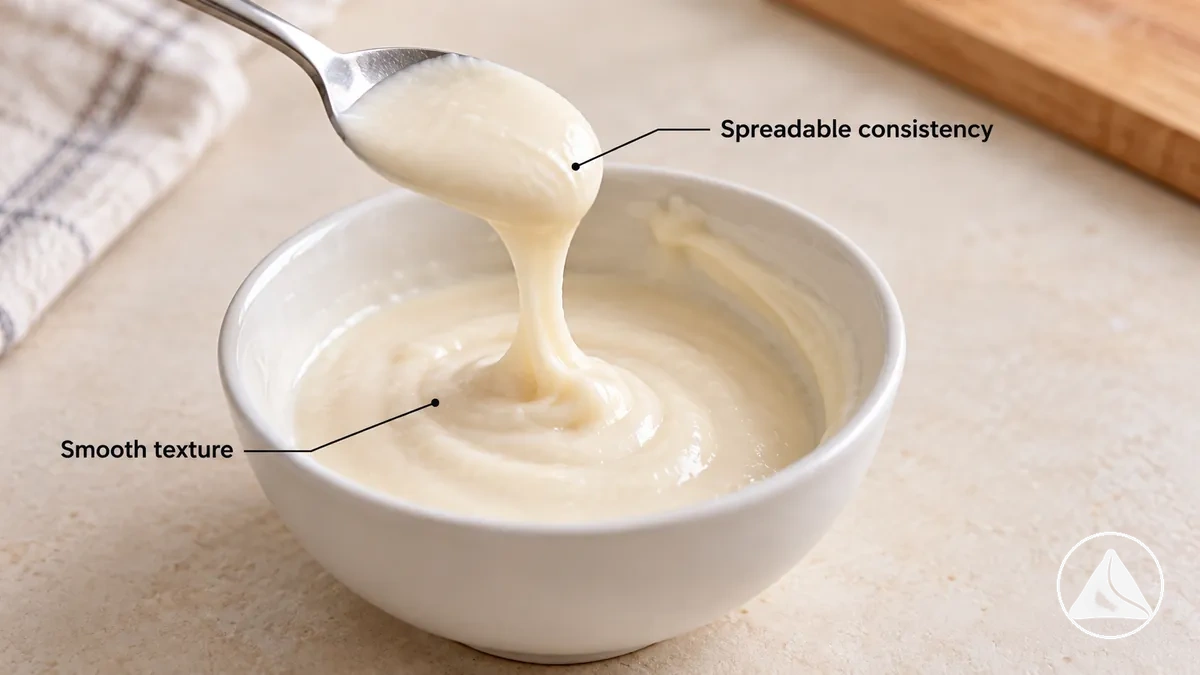
Add water gradually because different flours and batch sizes may require different amounts to reach a usable consistency.
Mixing between small additions helps break up lumps and makes the paste easier to adjust without becoming watery.
The method below uses observable texture rather than a fixed flour-to-water ratio.
- Combine the ingredients: Place a small amount of plain flour in a clean bowl and add a little water. Stir to begin forming a cohesive paste.
- Mix until smooth: Stir thoroughly, pressing any dry flour or visible lumps against the side of the bowl until the mixture has an even texture.
- Adjust the consistency: Add water a little at a time if the paste is too stiff to spread, or mix in a small amount of flour if it flows too freely. Stir after each addition until the paste becomes smooth and tacky.
- Check the texture: Lift a small amount with a spoon and spread it into a thin line. The paste should spread evenly, hold its position, and leave no watery pooling or thick clumps.
The sealing paste is ready when a thin layer stays where spread and allows the wrapper edges to lie flat against each other.
Fold the Wrapper into a Samosa Cone
Fold a samosa wrapper into a cone by bringing its edges together in sequence until they form a closed pointed tip and an open top with enough space for filling.
The wrapper's orientation and first fold determine how the edges overlap to create the cone seam.
The visual below shows the sequence from a flat wrapper to an open cone, which becomes a closed triangular samosa after filling and final sealing.
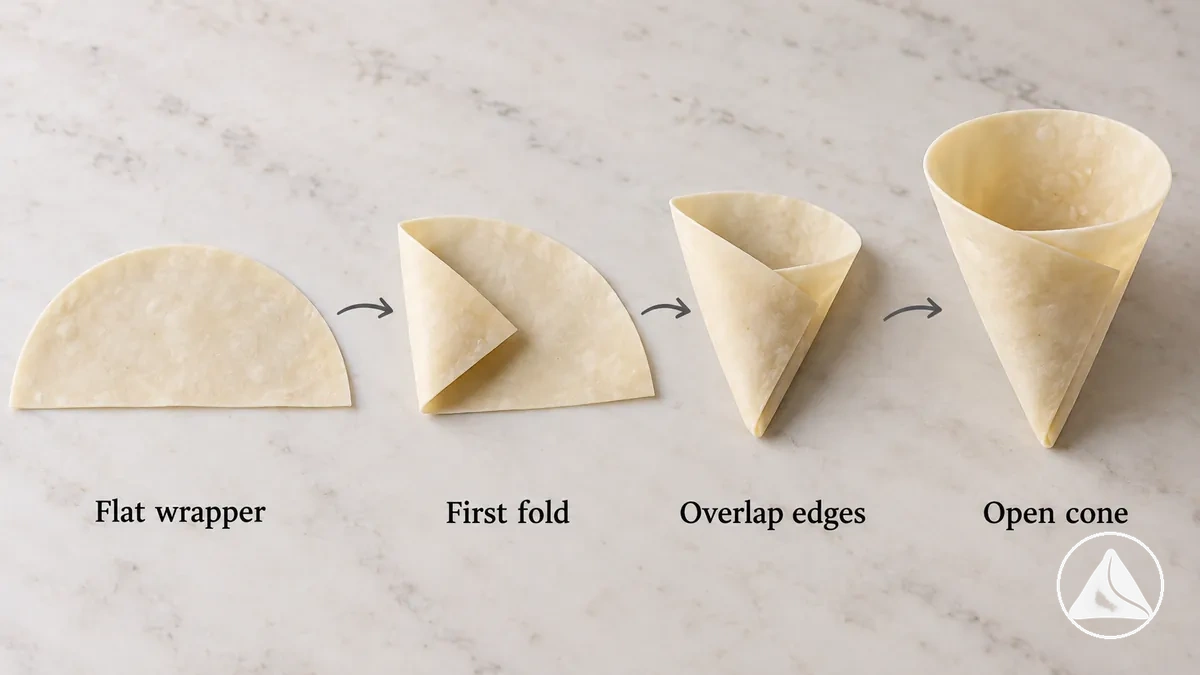
- Orient the wrapper: Lay a semicircular samosa wrapper flat with its straight cut edge facing you and the curved edge pointing away. If using a different wrapper shape, adjust its orientation so two edges can meet to form a cone seam.
- Make the first fold: Lift one end of the straight edge and fold it diagonally inward to begin forming one side of the cone. Keep the folded section smooth and leave room for the opposite edge to overlap.
- Form the cone: Bring the opposite end of the wrapper across the first fold, overlapping the edges to create a hollow cone. Position the folds so they meet at a pointed tip while leaving the wider top open.
- Align the overlapping edges: Bring the wrapper edges into continuous contact along the cone seam and hold them together. Keep the overlap flat so the pointed tip stays closed without unnecessarily narrowing the opening. When using flour-and-water paste, spread a thin film on the overlap's contact surfaces and press the edges together so the cone seam holds before filling.
- Check the cone shape: Hold the cone upright with the pointed tip facing down and the opening facing up. Check that the wrapper maintains its cone shape and provides a usable cavity for filling.
The empty samosa cone is ready for filling when its pointed tip is closed, the overlapping seam is aligned, and the top opening remains accessible.
Overlap the Wrapper Edges to Form the Cone
Overlap the wrapper edges evenly so they make flat, continuous contact along the cone seam and meet at a closed pointed tip.
The overlap should be sufficient to close the side without unnecessarily narrowing the cavity or reducing the opening needed for filling.
The image below shows how edge alignment creates a closed seam while leaving usable cone space.
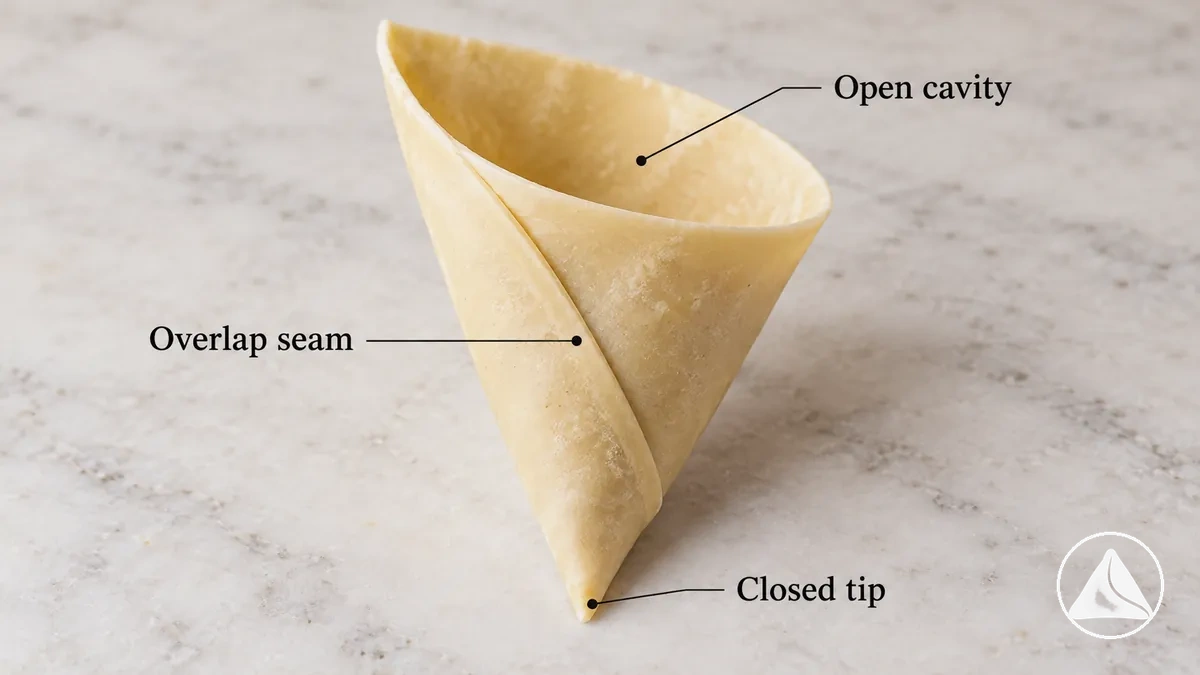
- Too little overlap
- A visible slit may remain along the side seam or near the pointed tip.
- Enough overlap
- The edges lie flat in continuous contact; the tip is closed and the filling cavity remains usable.
- Too much overlap
- Extra pastry wraps around the cone, narrowing the opening and reducing filling space.
Judge overlap by the wrapper's width and shape, not a fixed measurement: the tip should be closed, the seam free of slits and the cavity open.
Check the Cone for Gaps Before Filling
Check the empty samosa cone for visible gaps before adding filling, while the pointed tip, side seam, and wrapper edges are easy to inspect and correct.
The image highlights a small slit and a properly closed area to show where edge contact should be checked before filling adds pressure to the cone.
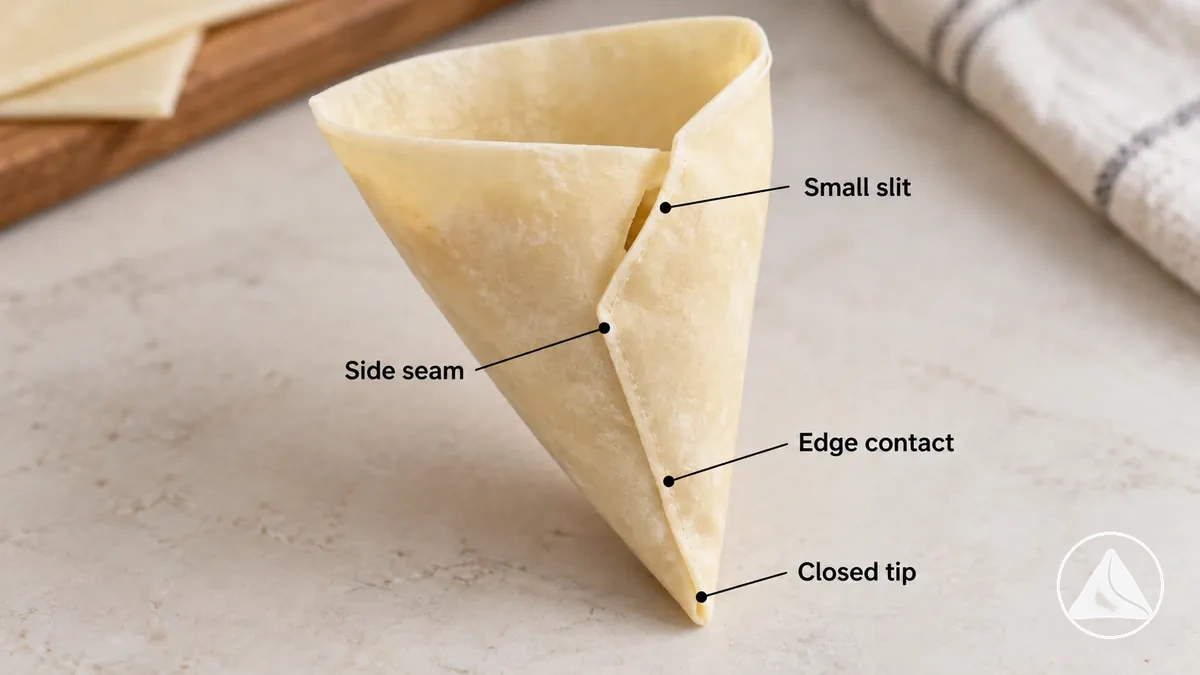
- Pointed tip: Check that the tip is fully closed, with no visible hole where the wrapper folds meet. A gap at the tip needs correction before filling because it creates a possible escape point.
- Side seam: Follow the overlapped seam from the pointed tip towards the open top. The seam passes when no slit exposes the cone interior; if the edges separate, bring them back into contact before filling.
- Overlap and edge contact: Check that the overlapping wrapper edges lie flat against each other without lifting or curling. A loose overlap suggests unstable seam contact and should be realigned and secured before proceeding.
- Wrapper tears: Inspect the wrapper around the folds for cracks, splits, or tears. Intact pastry passes this check; a torn wrapper needs correction or replacement rather than filling over the damaged area.
- Unintended openings: Look for small gaps where folds meet, apart from the intended top opening. If a minor gap remains, adjust the fold and press the edges together with a little sealing paste until the opening is closed.
The empty cone is ready to receive filling when its pointed tip is closed, the side seam has continuous edge contact, and no unintended gaps or tears remain visible.
Add Filling Without Overfilling the Cone
Add filling to the samosa cone until it is well filled but still has enough headspace and free wrapper above the filling for the top edges to meet without stretching.
The correct filling amount depends on the cone's size and capacity rather than a fixed number of spoonfuls.
The image shows how leaving a clear sealing margin above the filling allows the wrapper edges to come together for closure.
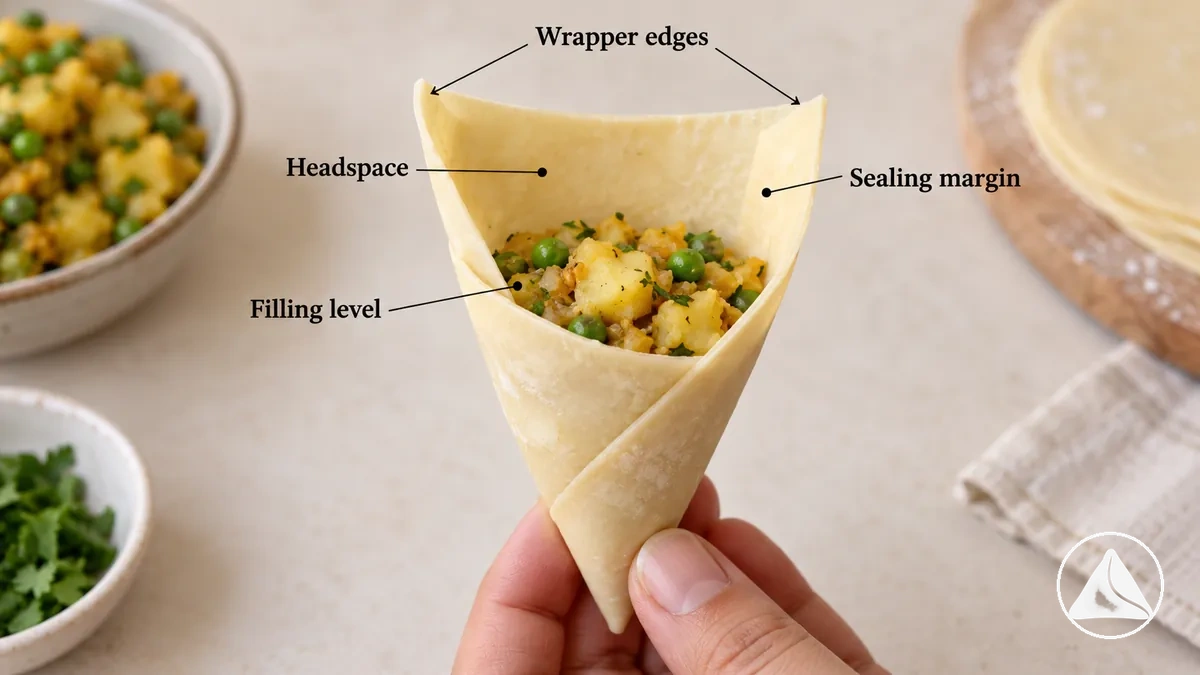
A smaller wrapper holds less filling while leaving the same need for free edges at the opening.
Bulky filling can occupy more space inside the cone than finely divided filling, so add it gradually and judge the level by the wrapper's shape.
Overfilling increases pressure against the wrapper, reduces the sealing margin, and can make the edges difficult to bring together without distortion; too little filling may affect the samosa's shape but leaves more room for closure.
The following criteria help determine when to stop adding prepared filling, rather than how to prepare the filling itself.
- Filling level: Enough filling sits inside the cone below the top edge without forming a mound above the opening. Filling that rises beyond the opening indicates overfilling and needs to be reduced.
- Headspace: A visible space remains between the filling surface and the open top of the cone. If the filling reaches the top and crowds the opening, there is insufficient room for closure.
- Sealing margin: A continuous area of free wrapper remains above the filling, allowing the opposing edges to overlap and make contact. Filling that covers this area reduces the available sealing surface.
- Wrapper shape and edge contact: The cone retains its shape, and the top edges can be brought together without stretching, bulging, or pushing filling outward. If the edges resist meeting or a gap appears under pressure, take out a little filling.
Before sealing, bring the top wrapper edges together lightly to confirm that they meet without strain and leave a continuous sealing margin above the filling.
Close and Seal the Filled Samosa
Close the filled cone by positioning the open edges above the filling, applying sealing paste, joining the edges into a triangular parcel, and checking that the seam has continuous contact.
The remaining headspace allows the wrapper edges to meet without stretching or forcing filling into the closure.
Follow the sequence below to keep the edges aligned and the final opening securely joined.
- Position and align the edges: Hold the filled cone with the open edges accessible and bring them towards each other above the filling. Keep the wrapper aligned so the edges can meet without stretching or distorting the cone.
- Apply sealing paste: Spread sealing paste along the wrapper edge where the final seam will form. Keep the contact area clear of filling so the overlapping surfaces can meet directly.
- Join and close the opening: Bring the prepared edges together to form a triangular parcel, then apply even pressure along the closing seam. A thicker or less flexible wrapper may require different handling pressure, but the edges still need continuous contact.
- Verify the closure: Check that the final seam lies flat, the edges remain aligned, and no visible gaps interrupt contact along the opening. The triangular shape should remain stable without filling pushing against the seam.
The filled samosa is sealed when it forms a closed triangular parcel with continuous seam contact, although filling condition and cooking conditions can also affect whether the wrapper stays intact later.
Apply Sealing Paste Along the Open Edge
Spread a thin, continuous layer of sealing paste along the open edge of the filled samosa, covering the wrapper surfaces that will touch when the final seam is joined.
The paste should coat the entire contact area, including both ends of the opening, without spreading onto the filling.
Apply it immediately before joining the edges so the coated surfaces can make direct contact.
- Too little
- Dry patches remain, so parts of the wrapper may not adhere when pressed together.
- Thin, continuous coating
- A light, even film covers the full contact area without exposed sections.
- Too much
- Thick clumps or drips can reach the filling and make the contacting edges slippery.
The edge is ready to close when the paste covers the contact area without dry gaps, drips or clumps.
Press the Final Seam Closed Without Gaps
- Align before pressing. Bring the pasted edges together evenly, matching the corners and keeping filling clear of the contact area so the wrapper surfaces can touch continuously.
- Press along the whole seam. Use gentle, even finger pressure from one corner to the other while keeping the joined edge flat and aligned.
- Inspect and correct. Look along the entire seam and lightly run a fingertip over it for gaps, lifted edges or loose contact. If misalignment, uneven pressure or trapped filling has left a gap, clear the obstruction, realign and press that section again until contact is continuous.
Check and Correct the Seal Before Cooking
The samosa is ready for cooking when its seal has continuous, closed seams with no visible gaps, tears, loose edges, or trapped filling at the contact surfaces.
Check the entire triangular parcel before introducing heat, while any opening, obstruction, or distortion can still be corrected.
The following checklist identifies the conditions that must pass before cooking can proceed.
- Cone tip: Check that the pointed tip is fully closed with no visible hole or separation. A closed tip passes; an open tip needs correction before cooking.
- Side overlap: Inspect the overlapping wrapper edges along the side of the samosa. The overlap passes when both surfaces lie flat together; raised or separating edges require correction.
- Final seam: Follow the closing seam from one end to the other and confirm continuous edge contact. A flat, closed seam passes; any visible gap or loose section needs attention.
- Corners: Check each corner for an open fold, lifted flap, or small slit. Fully closed corners pass; an opening at any corner requires correction before proceeding.
- Wrapper tears: Inspect the pastry surface for cracks, splits, or tears that expose or weaken the filled parcel. An intact wrapper passes; visible damage needs attention before cooking.
- Shape and distortion: Check that the samosa holds its triangular shape without excessive bulging, stretching, or pressure against the sealed edges. A stable shape passes; visible distortion needs correction before proceeding.
- Trapped filling: Inspect the sealed edges for filling caught between the contacting wrapper surfaces. A clear, closed contact area passes; trapped filling or a resulting gap must be corrected before cooking.
When every check passes, the assembled samosa is ready for cooking, and the next stage is to fry sealed samosas.
A sound seal supports structural readiness but does not guarantee the finished result, because filling condition and cooking conditions can also affect the wrapper.
Check for Open Corners, Gaps, and Loose Seams
Identify visible sealing defects by checking where the samosa wrapper separates and whether the joined layers maintain continuous contact.
An open corner, seam gap, loose overlap, or wrapper tear can indicate a different folding or sealing condition, so compare each defect's location and contact state before choosing a correction.
- Open corner: A visible opening at one of the triangular corners suggests that the folded wrapper edges have not remained joined at that point. Check whether the separation is confined to the corner or continues along the adjoining seam.
- Seam gap: A narrow slit along the final closing seam indicates interrupted contact between the pasted edges. Follow the seam from corner to corner to determine whether the gap is localised or whether a longer section of the edges has separated.
- Loose seam: A seam that looks closed but separates under gentle handling suggests that the wrapper layers have not maintained firm contact. Lightly touch the joined edge and check whether the layers remain together without deliberately pulling them apart.
- Loose side overlap: A raised or curling wrapper edge along the cone's side suggests that the overlapping layers are not lying flush against each other. Compare the lifted section with the surrounding flat overlap and check whether light contact reveals further separation.
- Wrapper tear: A crack or split through the pastry suggests damage to the wrapper itself rather than an opening caused only by separated seam edges. Check whether the defect runs through the wrapper surface instead of following an existing fold or joined edge.
A seam can look closed but still be loose if its layers separate with gentle handling. Such defects may weaken the closure, although they cannot by themselves establish whether the samosa will open during frying; filling and cooking conditions also matter.
Reseal Loose Edges Before Cooking
A loose edge on an uncooked samosa indicates that part of the seam is separating instead of maintaining continuous contact.
Inspect the contact area to identify why the wrapper layers have separated, then correct the local condition rather than repeatedly pinching the whole samosa.
- Filling caught in the seam
- Clear the obstruction from between the wrapper layers before bringing the edges together again.
- Dry or poorly adhering section
- Add a small amount of paste to the affected contact surfaces, without creating excess moisture or thick clumps.
- Uneven or misaligned edges
- Realign the wrapper layers and press the affected section with gentle, even pressure, not forceful pinching.
Stop when the seam is flat and continuously joined, with no visible opening or easy separation under gentle handling; further manipulation is unnecessary.